Introduction
This document describes how to build a docker container to run Owncloud on a Raspberry Pi (running Raspbian Jessie). I chose MariaDB as the Owncloud database and Let’s Encrypt to enable SSL.
Installing Docker and Docker Compose
Docker can be installed easily using the following command:
# curl -sSL get.docker.com | sh
As we will use 2 containers for this Owncloud setup, we also need docker-compose in order to start all services using one single command.
To install docker-compose on Raspbian, use the following commands:
$ sudo apt-get install python-pip -y
$ sudo pip install docker-compose
Note: Many images in the Docker Hub are for x86 Linux systems. You need to look for images which are built for Raspberry Pi (ARM). Usually, these images have a name which begins with “rpi-” or “armhf-“.
You can find some ports on the following repository: https://hub.docker.com/u/hypriot/
Method
To build Docker images for Raspberry Pi, I download the Dockerfile of official images from the Docker Hub and modify them to change at least the base operating system (which is a x86 Linux for official images) and the packages. For these containers, I chose Raspbian Jessie as the operating system using the image “resin/rpi-raspbian:jessie”.
If you want to run these containers on your Raspberry Pi, you can either pull the images from my Docker hub repository (blepiolot/rpi-mariadb, blepiolot/rpi-apache-php and rpi-owncloud) or rebuild the images using the Dockerfiles provided below.
MariaDB Container
Customize the official Dockerfile for Raspberry
Download “Dockerfile” and “docker-entrypoint.sh” from “https://github.com/docker-library/mariadb/tree/master/10.0” (link from https://hub.docker.com/_/mariadb for different versions of MariaDB).
You can also download the Github repository (https://github.com/docker-library/mariadb/archive/master.zip)
docker-entreypoint.sh must be executable:
$ chmod +x docker-entrypoint.sh
Edit the Dockerfile:
– Change the base image: FROM resin/rpi-raspbian:jessie
– Comment the lines that concern the percona repository declaration (around line 68)
– Set the minor version to install: ENV MARIADB_VERSION 10.0.29-0+deb8u1
(apt-cache showpkg mariadb-server => 10.0.32-0+deb8u1)
– After the declaration of MARIADB_VERSION, comment the insertion of the mariadb repository (around line 79)
– Remove the installation of “percona” and “socat” packages (around line 98)
Click here to download the Dockerfile.
Building
# docker build -t blepiolot/rpi-mariadb .
# docker tag 776f42dadb1e blepiolot/rpi-mariadb:10.0.32
Apache/PHP Container
Customize the official Dockerfile for Raspberry
Download the Github repository of the official PHP Docker image: https://github.com/docker-library/php/archive/master.zip (you can also find the links for different versions of PHP from https://hub.docker.com/_/php/)
Unzip master.zip in the folder from which you want to build the image.
$ unzip master.zip
$ cp php-master/7.1/jessie/apache/Dockerfile .
$ cp php-master/7.1/jessie/apache/docker-php-* .
$ cp php-master/7.1/jessie/apache/apache2-foreground .
$ chmod +x docker-php-source
Edit the Dockerfile:
– Change the base image: FROM resin/rpi-raspbian:jessie
Click here to download the Dockerfile.
Building
# docker build -t blepiolot/rpi-apache-php .
# docker tag 5801f0154498 blepiolot/rpi-apache-php:7.1.13
(This build requires a lot of memory, I had to shutdown other docker containers and Kodi to compile it)
Owncloud Container
Download the Github repository of the official Owncloud Docker image: https://github.com/docker-library/owncloud/archive/master.zip (you can also find the links for different versions of Owncloud from https://hub.docker.com/_/owncloud/)
Unzip master.zip in the folder from which you want to build the image.
$ unzip master.zip
$ cp owncloud-master/10.0/apache/Dockerfile .
$ cp owncloud-master/10.0/apache/docker-entrypoint.sh .
Edit the Dockerfile:
– Change the base image: FROM blepiolot/rpi-apache-php:latest
– Add the installation of package vim (around line 19)
– Add the timezone declaration
RUN echo “TZ=’Europe/Paris’; export TZ” > /etc/profile
– Enable Apache SSL module (a2enmod ssl)
RUN set -ex; \
a2enmod rewrite; \
a2enmod ssl;
– Add packages to issue “Let’s Encrypt” certificates
RUN set -ex ; \
echo “deb http://ftp.debian.org/debian jessie-backports main” > /etc/apt/sources.list.d/backport.list; \
apt-key adv –keyserver ha.pool.sks-keyservers.net –recv-keys 8B48AD6246925553; \
apt-key adv –keyserver ha.pool.sks-keyservers.net –recv-keys 7638D0442B90D010; \
apt-get update; \
apt-get install python-certbot-apache -t jessie-backports;
– Add a volume for Apache and let’s encrypt configuration
VOLUME /etc/apache2
VOLUME /etc/letsencrypt
Click here to download the Dockerfile
Building
# docker build -t blepiolot/rpi-owncloud .
# docker tag 52b0c507203f blepiolot/rpi-owncloud:10.0.4
Using Docker Compose to run Owncloud with MariaDB
Create the “docker-compose.yml” file:
# ownCloud with MariaDB/MySQL
version: ‘2’
services:
owncloud:
image: blepiolot/rpi-owncloud:latest
container_name: owncloud-01
ports:
– 80:80
– 443:443
volumes:
– html-volume:/var/www/html
– apache2-conf-volume:/etc/apache2
– letsencrypt-conf-volume:/etc/letsencrypt
depends_on:
– mysql
mysql:
image: blepiolot/rpi-mariadb:latest
container_name: mariadb-01
volumes:
– db-volume:/var/lib/mysql
environment:
MYSQL_ROOT_PASSWORD: <Choose you own password>
volumes:
html-volume:
apache2-conf-volume:
letsencrypt-conf-volume:
db-volume:
Click here to download the “docker-compose.yml” file
Run the images with docker-compose
Go to the directory where the “docker-compose.yml” is and run the following command:
# docker-compose up -d
Enable SSL
Once the containers are up, perform the following actions to complete the setup and enable SSL:
- Set the ServerName
Open a shell in the container:
root@hostname:/home/root# docker exec -it owncloud-01 /bin/bash
root@c48d0c3e2e8e:/var/www/html# vi /etc/apache2/sites-enabled/000-default.conf
# Add the following directive to set the hostname of your owncloud server
ServerName <Replace with the FQDN of your owncloud server>Note that a DNS entry for this FQDN must exist. - Issue the let’s encrypt certificate and enable SSL
Open a shell in the container:
root@hostname:/home/root# docker exec -it owncloud-01 /bin/bash
root@c48d0c3e2e8e:/var/www/html#certbot –authenticator webroot –webroot-path /var/www/html –installer apache -d <Replace with the FQDN of your owncloud server>
Saving debug log to /var/log/letsencrypt/letsencrypt.log
Enter email address (used for urgent renewal and security notices) (Enter ‘c’ to
cancel): <Enter you email>
Starting new HTTPS connection (1): acme-v01.api.letsencrypt.org——————————————————————————-
Please read the Terms of Service at
https://letsencrypt.org/documents/LE-SA-v1.2-November-15-2017.pdf. You must
agree in order to register with the ACME server at
https://acme-v01.api.letsencrypt.org/directory
——————————————————————————-
(A)gree/(C)ancel: A
Obtaining a new certificate
Performing the following challenges:
http-01 challenge for <FQDN of your owncloud server>
Using the webroot path /var/www/html for all unmatched domains.
Waiting for verification…
Cleaning up challenges
Generating key (2048 bits): /etc/letsencrypt/keys/0000_key-certbot.pem
Creating CSR: /etc/letsencrypt/csr/0000_csr-certbot.pem
Deploying Certificate to VirtualHost /etc/apache2/sites-available/000-default-le-ssl.conf
Enabling available site: /etc/apache2/sites-available/000-default-le-ssl.conf
Rollback checkpoint is empty (no changes made?)Please choose whether HTTPS access is required or optional.
——————————————————————————-
1: Easy – Allow both HTTP and HTTPS access to these sites
2: Secure – Make all requests redirect to secure HTTPS access
——————————————————————————-
Select the appropriate number [1-2] then [enter] (press ‘c’ to cancel): 2
Redirecting vhost in /etc/apache2/sites-available/000-default.conf to ssl vhost in /etc/apache2/sites-available/000-default-le-ssl.conf——————————————————————————-
Congratulations! You have successfully enabled https://<FQDN of your owncloud server>
root@d62613fd29f4:/var/www/html#
Configure owncloud
Using a browser, connect to your owncloud server: https://<FQDN of your owncloud server>
You should reach the configuration page of Owncloud.
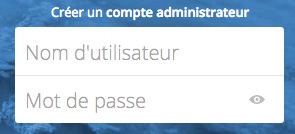
Choose an administrator name and password:

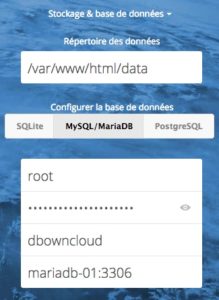
Deploy Storage and Database and click on “MySQL/MariaDB” for the database.
Enter the required information to connect the the MariaDB database and choose a name for the owncloud database (dbowncloud in this example):

Note that the MariaDB administrator (root in this case) is only used to connect to MariaDB in order to create the owncloud database and a dedicated MariaDB administrator. After these operations are completed, Owncloud is only using the MariaDB administrator it created (and not root).
Click on “Finish Setup”

You can refer to https://doc.owncloud.org/server/10.0/admin_manual/installation/installation_wizard.html#the-installation-wizard if you want more information regarding the installation wizard.
You can now connect with the administrator account and configure other owncloud users and parameters.
Enjoy !
